

Some of my avid readers (HAH!) might recognize these, they were some chairs I was commissioned to upholster for a client, wonderful old pieces, handcarved, the whole bit...
Anyhow these chairs came to me in such a disgusting mess, all we could do was rip them apart and clean them up... they were Gross! Look at the picture above, beneath the springs all the burlap turned to dust. This is the reason I hate doing re-upholstery! Despite all this they were amazingly well upholstered, horsehair, sewn edges, the whole nine yards. I would have loved to see these chairs when they were new! They had been upholstered about 3 times since then! the last upholstery job being a quick cover up horribly done!

Once I had the chairs taken apart, frames re blocked, glued and strengthened I had to decide how I was going to upholster these bad boys. The purists out there are going to hate me for doing this, but I decided to redo them using foam, my weapon of choice. There was no way I was going to be retying springs, padding cotton and all that and rebuilding these chairs. That would have been dusty, unhygienic, heavy and uncomfortable. I used a combination of foams from 8lb to 2.6 lb densities and from 28 to 90 ILD(firmness... your sofa is probably around a 28). All rated at commercial grade and will easily give my client at least 20 years of daily usage... at least! I began by strapping the frames with pirelli webbing...

Foam combos.... you can see the foam here post gluing. the layers are obvious,the foam seat is crested using foam layering... very good way to create a comfy and permanent crest in the seats!

Here is how I get a nice rounded edge. I laminate the edge of a piece of .5 inch UC 52 to the top layer of foam.

I pinch the foam down over the rest of the seat creating a nice smooth contour along all edges, I then pinch them together in the corners... Yummy!

Look at how well this foam pad fits, and it is extremely firm, so it will hold the material taut and clean.

This photo illustrates the age and the condition of the chairs. It looks like someone took a Tommy Gun to the edges of the chairs...I repaired as much as I needed to by squirting wood glue into the cavities... worked extremely well.

Burlap was used to bridge the back prior to upholstery.

The initial strap is for strength and is a good way to use wastage. Below you can see the process of stretching the burlap into place. I am not sure why burlap is used, but it is so there.

Preupholstery is key to this style of re-upholstery. That is upholstering the chair in a muslin or other fabric to give it shape and stability, and then applying the final cloth over top, as decoration basically. The upholstery will look better, last longer and even taste better. I have an interesting story... the under fabric I am using for the seats of this chair (pictured below) belonged to a nightmare client. We were commissioned to design and fabricate the maid's quarter's curtains for their palatial estate as a litmus to see whether we were good enough to make curtains for their home. Sadly, the homeowner was firmly set in her own ways, one of which included using the fabric below to fabricate curtains. I protested saying that the fabric was too boring and the completely wrong colour. I was defeated and we made the curtains. They made up awesome (ugly but awesome), and to an extremely high level of finish. The client found dozens of problems with the curtains including the pattern and colour of the fabric, saying they looked inappropriate and cheap.... DUH! In other words she had me make and install a curtain she designed and she hated it, but then blamed it on me.... the best part came when I finally walked away making it known to her that those were going to be the best made curtains in her house, and they belonged to the maid!
Anyways I was left with 30 odd yards of this material and was determined to make something good of it, I have used it on projects where I needed linings, muslins, templates... and every project I have used it in has turned golden...

Anna, the human scissor is cutting the material for my chairs!!! Yay!

Backs are ready to go! now all we need are staples propelled at 80 psi....

I use long pins to center the pattern...

Stapling into the surrounding ditch.....

Folding the fabric over onto iteslf and stapling the fold to the frame. Then you trim away the excess!

Here's half of the chairs ready for trimming! Don't they look great!

The remaining chairs were upholstered in a stripe. Here I am tacking the Gimp into the top inside corner.

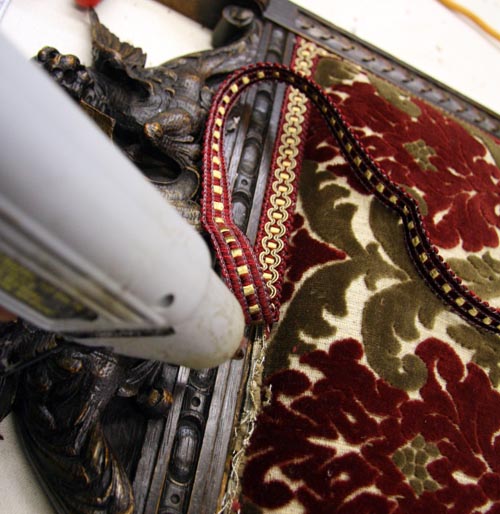
Hot Glue works very well....
You Must remember to tack those corners in well!

Mitering trim is a specialty of mine... apparently!

Voila, chair style #2

First Instalment of the chairs in place... La de da!

No comments:
Post a Comment